Reverse Peroneal Artery Flap for Large Heel and Sole Defects: A Reliable Coverage
Yogesh C. Bhatt, Sumer Singh,* Piyush Doshi, and Sanjay G. Vaghani
The flap was planned in reverse with pivot point 5 cm above the lateral malleolus with a narrow base between lateral malleolus and tendoachilles. To avoid injury to the important communicating vessels, an area of 5 cm above the lateral malleolus is kept undisturbed. The flapcan be safely extended to the upper end of the leg, up to the line of the knee joint and laterally up to the mid lateral line on either side (Figure 1) according to need. Incision was taken straight down deep to the fascia on the marked lateral side(fibular side) of the flap. The perforators from peroneal artery were seen entering to skin at this stage. These are reasonably constant in the middle third of the leg.
Defect preparation and flap marking of the reverse peroneal artery flap. Marking was planned in reverse. Base of the flap was between tendoachilles and lateral malleolus and 5 cm above the lateral malleolus. Lateral border of the flap marked over fibula and medial border marked in such a way that short saphenous system included in the flap. Fibular side of the flap dissected and peroneal vessels ligated at this stage after confirming the entrance of the proximal perforators in to the flap
We select most proximal and big perforator to include in our flap. Then dissection is done deep to peroneus muscles separating them from flap and fibula. Periosteum of this side fibula separated from bone through which we directly go to the peroneal artery (Figure 2). Now upper end of the flap dissected subfascially and short saphenus vein along with sural artery and sural nerve were included in the flap (Figure 3). Medial side of flap then subfascially elevated till (septum) those perforators which were initially identified. Now peroneal artery with venae comitantes ligated proximally and then flap elevated from here to distal side (Figure 2).

After elevating the fibular side of the flap, peroneal perforators identified and peroneal vessels ligated proximal to the most proximal perforator entering in to the flap. A big perforator seen entering in to the flap just below artery forceps
Branches of the artery going away were coagulated with bipolar or ligated. Sometimes part of flexor hallucis longus muscle was taken with flap if peroneal artery is embedded in muscle (Figure 4 and and5).5). A good fascial layer is left over tendoachilles. At this stage tourniquet released and flap blood supply checked and complete hemostasis achieved. Flap is then sutured to defect and donor site skin grafted. The pedicle of the flap and raw area of the flap is also skin grafted. An experience of free fibula flap dissection and perforator flap dissection leads to some easiness in dissection of this flap.

Elevated flap with the peroneal vessles and part of the flexor hallucis longus muscle. Sural vessels, short saphenous vein, peroneal vessels and tendoachilles with paratenon seen in the picture

Reverse peroneal artery flap with peroneal vessels in the flap
We used plaster of Paris slab on dorsal side of leg with some planter flexion at the ankle joint so that flap come in relaxed position. To prevent pedicle compression, extra padding was used over pedicle along with lateral position of the patient on the bed. Two pillows elevation was also given to improve venous outflow and to reduce edema of the flap. In 2 cases we completely islanded the flap and single stage surgery done (Figure 6). In 7 other pedicled flaps second stage of surgery (final inset) done after 18 days of primary surgery under local anesthesia (Figure 7 and and8).In8).In one patient due to deep infection lower 4 cm of fibula get exposed which was removed under spinal anesthesia.

Healthy flap with the almost complete graft uptake seen on 4th postoperative day dressing

Wide local excision with reverse peroneal artery flap coverage. Peroneal vessels seen in the flap.

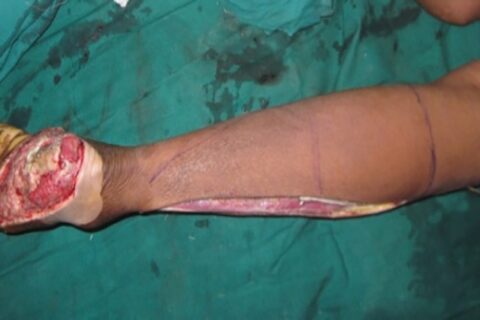
Final appearance after flap inset
References
References
- Benito-Ruiz J, Yoon T, Guisantes-Pintos E, Monner J, Serra-Renom JM. Reconstruction of soft tissue defects of the heel with local fasciocutaneous flaps. Ann Plast Surg. 2004;52:380–4. [PubMed] [Google Scholar]
- Eren S, Ghofrani A, Reifenrath M. The distally pedicled peroneus brevis muscle flap: A new flap for the lower leg. Plast Reconstr Surg. 2001;107:1443–8. [PubMed] [Google Scholar]
- Ríos-Luna A, Villanueva-Martínez M, Fahandezh-Saddi H, Villanueva-Lopez F, del Cerro-Gutiérrez M. Versatility of the sural fasciocutaneous flap in coverage defects of the lower limb. Injury. 2007;38:824–31. [PubMed] [Google Scholar]
- Lu TC, Lin CH, Lin YT, Chen RF, Wei FC. Versatility of the pedicled peroneal artery perforator flaps for soft-tissue coverage of the lower leg and foot defects. J Plast Reconstr Aesthet Surg. 2011;64:386–93e. [PubMed] [Google Scholar]
- Donski PK, Fogdestam I. Distally based fasciocutaneous flap from the sural region: A preliminary report. Scand J Plast Reconstr Surg. 1983;17:191–6. [PubMed] [Google Scholar]
- Chang SM, Zhang F, Yu GR, Hou CL, Gu YD. Modified distally based peroneal artery perforator flap for reconstruction of foot and ankle. Microsurgery. 2004;24:430–6. [PubMed] [Google Scholar]
- Cormack GC, Lamberty GH. Blood supply by regions: Ankle and foot. In: Cormack , Lamberty , editors. The Arterial anatomy of skin flaps. London: Churchill Livingstone; 1994. pp. 258–9. [Google Scholar]
- Masquelet AC, Romana MC, Wolf G. Skin island flaps supplied by the vascular axis of the sensitive superficial nerves: Anatomic study and clinical experience in the leg. Plast Reconstr Surg. 1992;89:1115–21. [PubMed] [Google Scholar]
- Costa-Ferreira A, Reis J, Pinho C, Martins A, Amarante J. The distally based Island superficial sural artery flap: Clinical experience with 36 flaps. Ann Plast Surg. 2001;46:308–13. [PubMed] [Google Scholar]
- Rajacic N, Darweesh M, Jayakrishnan K, Gang RK, Jojic S. The distally based Superficial sural flap for reconstruction of the lower leg and foot. Br J Plast Surg. 1996;49:383–9. [PubMed] [Google Scholar]
- Ayyappan T, Chadha A. Super sural neurofasciocutaneous flaps in acute traumatic heel reconstructions. Plast Reconstr Surg. 2002;109:2307–13. [PubMed] [Google Scholar]
- Yang YL, Lin TM, Lee SS, Chang KP, Lai CSRuan HJ, Cai PH, et al. The extended peroneal artery perforator flap for lower extremity reconstruction. Ann Plast Surg. 2010;64:451–57. [PubMed] [Google Scholar]
- Mahboub T, Gad M. Increasing versatility of Reverse-flow sural flaps in distal leg and foot reconstruction. Egypt J Plast Reconstr Surg. 2004;28:99–112. [Google Scholar]
- Hansen T, Wikström J, Johansson LO, Lind L, Ahlström H. The prevalence and quantification of atherosclerosis in an elderly population assessed by whole-body magnetic resonance angiography. Arterioscler Thromb Vasc Biol. 2007;27:649–54. [PubMed] [Google Scholar]
- Satish C, Reddy S. A Rare Case of Extra GiganticDigit of sole. World J Plast Surg. 2017;6:1–3. [PMC free article] [PubMed] [Google Scholar]